| |
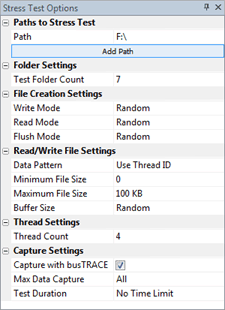
Before you can run a busSTRESS stress test, you first need to configure your stress test options. You adjust these settings in the Stress Test Options docked pane located on the left of the busSTRESS display:

Paths to Stress Test
| Add Path |
Before you can run a stress test, you need to let busSTRESS know which drives / paths to test. busSTRESS can run against any path such as a local disk path / drive letter, CD/DVD file system path, network path, removable media, etc.
You can configure busSTRESS to test one or more paths. Simply click on the Add Path button to add the paths. After a path has been selected, you can click on the Path and choose the drop down menu options of Edit Path or Remove Path. |
Folder Settings
Test Folder Count
|
Before busSTRESS begins its stress test, it creates a folder tree of stress test folders where we perform our read/write/compare stress test. Each stress test thread will randomly choose a created folder and perform a test there before moving onto the next random folder.
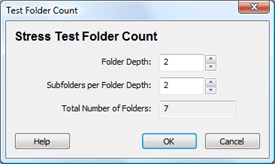
To adjust the folder tree, click on the Test Folder Count grid item and then click on the button that will appear. You will then be able to adjust the Folder Depth and the Subfolders per Folder Depth.

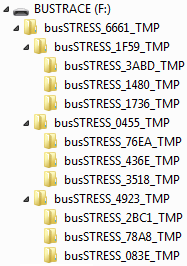
The Folder Depth and the Subfolders per Folder Depth let busSTRESS know how many stress test folders you would like to create. For example, a Folder Depth of two and a Subfolder count of three, on Drive F:, would create stress test folders of:

In the above example, busSTRESS started by creating a root test folder to work within. That is the root busSTRESS_661_TMP folder you see above. Under that root test folder, you can see that we have three sub-folders and that the stress test folder tree has a depth of two. |
File Creation Settings
| Write Mode |
The Write Mode option allows you to configure how busSTRESS creates files for writing using the Windows' CreateFile() API. You are given control over the FILE_FLAG_WRITE_THROUGH and FILE_FLAG_NO_BUFFERING flags as defined below. Please refer to the Windows SDK for details on how these flags change the way files are written to disk.
| Cache Enabled - Write Through Disabled |
FILE_FLAG_NO_BUFFERING = 0
FILE_FLAG_WRITE_THROUGH = 0 |
| Cache Enabled - Write Through Enabled |
FILE_FLAG_NO_BUFFERING = 0
FILE_FLAG_WRITE_THROUGH = 1 |
| Cache Disabled - Write Through Disabled |
FILE_FLAG_NO_BUFFERING = 1
FILE_FLAG_WRITE_THROUGH = 0 |
| Cache Disabled - Write Through Enabled |
FILE_FLAG_NO_BUFFERING = 1
FILE_FLAG_WRITE_THROUGH = 1 |
| Random |
This is the default setting. busSTRESS will randomly choose its setting each time a file is created for writing.
|
|
| Read Mode |
The Read Mode option allows you to configure how busSTRESS opens files for reading using the Windows' CreateFile() API. You are given control over the FILE_FLAG_NO_BUFFERING flag as defined below. Please refer to the Windows SDK for details on how these flags change the way files are read from disk.
| Cache Enabled |
FILE_FLAG_NO_BUFFERING = 0
|
| Cache Disabled |
FILE_FLAG_NO_BUFFERING = 1
|
| Random |
This is the default setting. busSTRESS will randomly choose its setting each time a file is opened for reading.
|
|
| Flush Mode |
The Flush Mode option allows you to configure whether or not busSTRESS uses the FlushFileBuffers() Windows' API. This API flushes the buffers of a file busSTRESS is writing too before we close the file handle.
| Never |
The FlushFileBuffers() API is never used. |
| Always |
The FlushFileBuffers() API is always used to flush the file buffer. |
| Random |
busSTRESS will randomly choose whether or not it uses the FlushFileBuffers API. This is the default setting. |
|
Read/Write File Settings
| Data Pattern |
When test files are created for the stress test, you can configure what data is written to file. Most of these settings are self-explanatory. Additional details are provided below for some of the less obvious settings:
| Use File Handle |
The 32-bit file handle, returned by the CreateFile() API, is used as the test file's data pattern. |
| Use Thread ID |
The 32-bit thread ID, of the thread running the stress test, is used as the test file's data pattern. This is the default setting. |
| Test All |
Using this option will cause busSTRESS to loop through and test each pattern available. After one pattern is tested on a file, busSTRESS will move to the next data pattern. |
|
| Minimum File Size |
Here you specify the minimum file size to create for stress testing. You can specify KB, MB, or GB when entering values. For example, to specify a minimum file size of 64 KBytes, you would simply type in "64 KB".
|
| Maximum File Size |
Here you specify the maximum file size to create for stress testing. You can specify KB, MB, or GB when entering values. For example, to specify a maximum file size of 2 GBytes, you would simply type in "2 GB".
|
| Buffer Size |
Here you specify the size of the buffer we use to perform a single read or write operation. The default value is Random.
|
Thread Settings
| Thread Count |
When busSTRESS is perform a stress test, it creates one or more background threads to perform a stress test. You adjust the number of background threads busSTRESS uses with this setting.
|
Capture Settings
| Capture with busTRACE |
busSTRESS allows you to capture its I/O activity with the busTRACE engine. This allows you to see the Windows API calls and any underlying low-level read/write requests going to the physical device. Details are available in our busSTRESS Integration with busTRACE section.
|
| Max Data Capture |
If you have configured busSTRESS to capture its I/O activity with busTRACE, you specify the maximum amount of data busTRACE should capture on each individual read / write request.
|
| Test Duration |
By default, busSTRESS will run forever until either an error is detected or the user stopped the stress test. You can configure busSTRESS to automatically stop after a predefined time here.
|
Loading / Saving stress test options
You can use the toolbar Load Options and Save Options buttons to save the stress test options and reload at a later time. You can click on the Default Options button to have busSTRESS revert back to default settings.
See Also:
|
|
![]() This WEB page comes from the busTRACE 9.0 User's Manual. (Table of Contents)
This WEB page comes from the busTRACE 9.0 User's Manual. (Table of Contents)